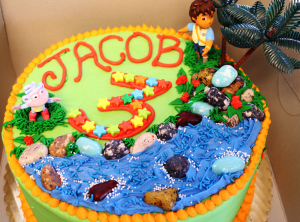
This cake was so much fun. I had more than my usual amount of time to devote to decorating it and I really enjoyed the process. I went out and got the decorations, Diego, trees, rocks etc and then after a few internet searches for ideas, made myself a sketch and went to work. The birthday boy’s eyes really lit up when he saw it and that is always a good feeling.
As for the cake itself, I used my favorite strawberry cake with a Chocolate Swiss Meringue Buttercream filling and a cream cheese frosting exterior. I think the combination worked although had I not had extra Swiss meringue butter cream from another project I probably would have made a strawberry cream cheese filling. I used two 10 inch cake pans and that worked well for this recipe which makes three 8 inch cakes.
Strawberry Layer Cake
4 ½ cups cake flour
3 cups sugar
5 ¼ teaspoons baking powder
¾ teaspoon salt
3 sticks (12 ounces) unsalted butter, at room temperature
1 ½ cups pureed fresh or frozen strawberries
8 egg whites
2/3 cup milk
1 to 2 drops of red food coloring to make it more pink (in my case a tsp of red gel, because I wanted it red)
Directions:
Preheat the oven to 350F. Butter or spray three 8 or 9 inch cake pans ( 1 used 2 10 inch). Line with parchment or waxed paper on the bottom and butter or spray the paper. This may seem like an unneeded extra step but I assure you, it’s the only failsafe way to know your cake will come out of the pan in one piece.
Add the flour, sugar, baking powder and salt n a large mixer bowl. With the mixer on low speed, blend for 30 seconds. Add the butter and strawberry puree and mix to blend the ingredients. Increase the speed to medium and beat until light and fluffy, about 2-3 minutes.
In another large bowl, whisk together the egg whites, milk and food coloring to blend. Add the egg white mixture to the batter in two or three additions, scraping down the bowl as needed and mixing only to incorporate after each addition. Divide the batter among the prepared cake pans.
Bake the cakes for 30 to 34 minutes, or until a cake tester or toothpick inserted into the middle comes out clean. Allow the cakes to cool in the pans for 10 to 15 minutes. Invert and turn out onto wire racks and peel off the paper liners. Let them stand until completely cooled before assembling the cake, at least an hour. Once they have cooled, you can wrap them in plastic wrap and place them in the freezer for 30 minutes; this will make assembling the cake much easier because the layers will be firm and not easily broken.
Once you remove the cake from the freezer, place a tiny dollop of frosting on the cake board to act as glue for the cake, then put the first layer on your cake board (for a 10 inch cake I used a 12 inch cake board). Add about 2/3 to 1 cups of frosting or filling and spread evenly. If you are using a filling that is different than your frosting, you will want to make a frosting “dam” around the outside of the cake layer to keep the filling from gushing out when you stack. I usually start out with a bit of my frosting in a pastry bag with a simple tip, to use for the dam. One by one layer/stack your cake, in my case, since I used two 10 inch rounds, so I cut them into two, so I had four layers total. Once you have all your layers assembled, crumb coat the entire cake (put a thin layer of frosting) and then put it back in the freezer or fridge until firm. Once firm, frost the cake and decorate how you like.
Recipe from: Smitten Kitchen
Vanilla Bean Cream cheese frosting
Chocolate Swiss Meringue Buttercream
**If you are unsure of how to assemble or frost your cake look it up on UTube, there is a video for everything and it can really help the process when you can watch it being done. I have watched many, many videos on there to get ideas or troubleshoot when I am stuck.


Feb 02, 2012 @ 08:50:37
How cute! The water looks really good. The red strawberry would be perfect for Valentine’s Day. Any plans for Valentines day treats?
Feb 02, 2012 @ 09:56:23
Thank you! I have a couple recipes I want to make ( sugar cookies and macarons) and I have some achived ones I may throw up this week for extra ideas.
Feb 11, 2012 @ 15:56:00
Hey, just thought I would let you know that I shared your recipe for Shrimp and Herbed Goat cheese with Asparagus Pasta for my Sunday Supper post this weekend. Really yummy., Mona
Feb 11, 2012 @ 20:43:35
Thank you so much! I am glad you enjoyed it.
Feb 25, 2012 @ 14:49:54
mom I really like this one